WordPress on Google Cloud: Access phpMyAdmin and files
Unlike some typical WordPress host companies, there is no direct page on Google Cloud to access phpMyAdmin and WordPress files. In this post, I will provide a quick summary of the methods.
phpMyAdmin for WordPress on Google Cloud
- Download PuTTY and PuTTYgen from this website (click this to link to the website). They are free to download and use.
- On PuTTYgen, click Generate to generate a key.

- Save private key in your local folder. (Keep this window open as we are going back to copy it into Google SSH later.)

- Click Edit on Google compute engine.

- Find the section of SSH Key on the Google Cloud. Copy and paste the private key generated in Step 2 into Google SSH. Click ADD ITEM and the click SAVE the SSH key on Google.

- Assume you have downloaded PuTTY already (not PuTTYgen). Click Connection -> SSH -> Auth -> Credentials -> Browse the key file saved from Step 3. (The file extension is .ppk.)

- Click Connection -> SSH -> Tunnels -> Type 8888 and localhost:443. Then, click Add.

- Click Session -> Copy external IP from Google cloud engine and paste it at Saved Sessions – Save and Host Name. (It seems you need to paste into both windows. Otherwise, there might be error. I am not very sure about this.)

- Click Connection -> Data and copy the username appeared in front of the added Google SSH Keys (i.e., the one added in Step 2). After the steps of 3, 4, 5 being done, you can click “Open” button. (Double check if all info from these 4 steps are still there. Otherwise, redo any missing one.)

- Type https://127.0.0.1:8888/phpmyadmin on your web browser. If you use Bitnami WordPress on Google Cloud, you should be able to see bitnami-base-password at your Google Cloud instance. Note that, the user name is root, the default one shown on the web page. This is not your WordPress wp-admin user name and password.

For more information, you can refer to this following YouTube video (not mine).
Access WordPress files on Google Cloud
Situation 1: You just want to delete a plugin
You might run into a situation such that you added a plugin and the whole WordPress crashes. (I do not know if you can safely delete a theme if that is what your problem is. Please consult a professional if your problem is related to a whole theme.)
That is, due to some mistake in the added plugin, you cann’t even login the WordPress wp-admin. The quickest way to solve the problem actually is to right click the SSH on Google Cloud instance and then click the Open in browser window.

You then see something like the screen below. If it is a plugin and you do not mind losing the plugin (e.g., you can download it again from public Internet easily), you can actually use a command to delete the plugin.

The command looks like below. Make sure that the command address is correct (you do not want to delete something you do not intend to delete) and it is okay for you to lose this plugin totally.
Warning: (1) “rm” stands for “remove” and is a command used to delete files and directories. (2) plugins means the plugins folder in WordPress files.
sudo rm -rf /bitnami/wordpress/wp-content/plugins/YOURPLUGINName
Situation 2: You want to check WordPress files when you can not check them via WordPress wp-admin portal
Note that, if you can access WordPress wp-admin portal and you set up the plugin of WP file manger, you can access WordPress files at the wp-admin portal interface. However, if your WordPress crashes, and you can not even login the wp-admin portal, the solution is to use a FTP interface.
- Download Google Cloud SDK. The link: https://cloud.google.com/sdk/docs/install After setting it up, it will link to your Google account and verify your identity. It is pretty automatic actually.

After setting up the software, you will see teh following interface:
- Get gcloud command line from the SSH option of “View gcloud command.”

- Copy the text shown in the gcloud command line and paste back to the Google Cloud SDK Shell (i.e., the window shown in Step 1).

The Google Cloud SDK Shell will show the following when it is done.
After it completes, the following window will pop up.
- It will save 3 files in C disk (if you are using Windows) -> Users -> Your user name in Windows ->. ssh folder. We will use them in next steps.

- Download FileZilla (it is free!) and click Edit -> Settings -> SFTP -> Add key file -> Choose: google_compute_engine.ppk (see the highlighted one). Click Open.

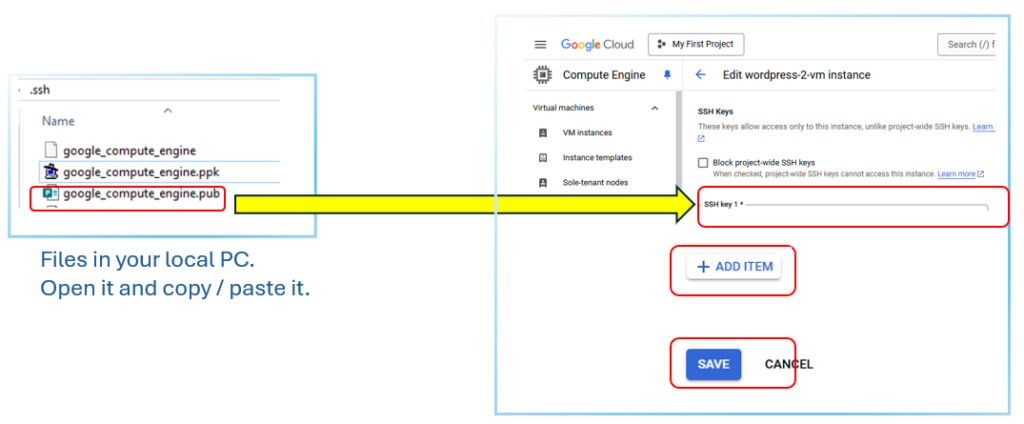
- Use a text reader such as Notebook on Windows to open the third file (the one ends with .pub, see the hightlighted one shown below) and then copy the key to Google create a new SSH key item in Google. Then, click ADD ITEM, and then click SAVE.

- Type sftp:// your external IP address from Google instance engine into Host on FileZilla. Then, the username appear in front of the SSH Key that you just pasted on Google SSH Key window. Finally, if you are using bitnami WordPress, you should be able to find the password on Google engine webpage. (As you can see, the logic of Username and Passowrd is the same as the last section where we try to link to phpMyAdmin.) Click Quickconnect and you should be able to see WordPress files on FileZilla.

For more information, you can refer to this following YouTube video (not mine).
Discussion